Do you want to know How To Root Redmi 7A then you are at the right place, Today in this article I have come with the guide to Root the newly launched Redmi 7A.
I have shown you five different methods to Root. If anyone of the method failed then you can try other methods that worked for you.
Page Contents
About Redmi 7A
This Redmi 7A is the newly launched device by Redmi. It has some great features, Here is some Key Specification of Redmi 7A:
- This phone comes with a 5.45 Inches 720 x 1440 pixels IPS Display
- Redmi 7A is powered by the Qualcomm Snapdragon 439 which is an Octa-Core CPU
- It has 3 GB of RAM and 32 GB of Internal Storage
- Moving to the OS this device runs on Android 9.0 (Pie)
- Camera – It has a Rear-Facing Camera of 13 MP and the Front-Facing camera is a 5 MP shooter
- Moving to the battery it has a Non-removable Li-Po 4000 mAh battery
- It has the following sensors Accelerometer, proximity, compass.
What Does Rooting Means?
Rooting your device simply means giving superpower to your phone. Once you root your phone, You have full control of your Android Device. You can do whatever you want to do with your Android System Settings.
But before we Root, we must know the Advantages and Disadvantages of Rooting your device.
Advantages Of Rooting
Here are some Pros or Advantages of Rooting Redmi 7A
- You Can Install Custom Rom
- Update Your Phone To A Newer Version Of Android
- You, Will, Be Able To Install Incompatible Apps On Your Android
- Get Custom Kernel To Increase Your Phone Performance
- Take Complete Backup Of Your Android
Related Article: Install Custom ROM On Redmi 7A
Disadvantages Of Rooting
Here are some Cons or Disadvantages of Rooting Redmi 7A
- Phone Warranty Will Be Void
- While Rooting If Anything Goes Wrong Your Might Be Bricked
- Your Device Will Be No Longer Secure
- You Won’t Be Able To Install Ota Updates Through Your Phone
Pre-Requirements
- Before Rooting Make Sure To Unlock Bootloader Of Redmi 7A
- Also, We Need To Install TWRP Recovery On Redmi 7A
- Fully Charge Your Device. If Not Then You Will Be Stuck In Between The Process
- Take Complete Backup Of Your Android
Root Redmi 7A With SuperSU: Method 1
- First Off Download SuperSu.zip File On Redmi 7A
- Turn Off Your Phone And Boot Into Recovery Mode
- Now To Boot Into TWRP Recovery
- Once You Are In TWRP Recovery
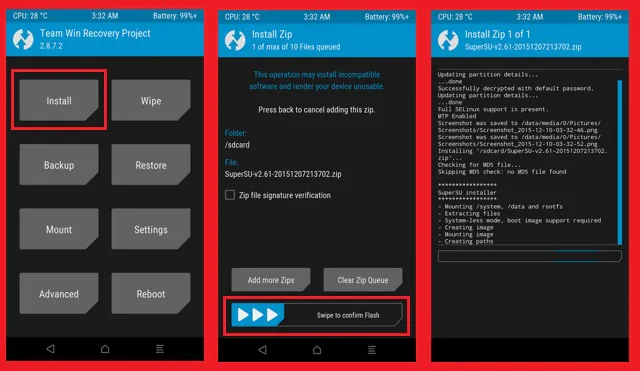
- Now Tap On Install >> Then Locate The SuperSU.zip File And Select It >> And Then Tap On Swipe To Confirm Flash
- That’s It 🙂 You Have Successfully Rooted Your Redmi 7A
Root Redmi 7A With Magisk Root: Method 2
- First You Need To Download Magisk.zip File On Redmi 7A
- Now Boot Your Phone To Recovery Mode By Pressing Volume Down + Power Button At Same Time Until You See The Boot Animation.
- After That Tap On Install >> Then Locate The Magisk.zip File And Select It >> And Then Tap On Swipe To Confirm Flash
- Once The Flashing Process Is Done. Tap On Reboot
- That’s It 🙂 You Have Successfully Rooted Your Redmi 7A
Root Redmi 7A With Single Click: Method 3
- First Download Kingo Root App And Install It
- Now Open Kingo Root And Tap On One Click Root
- After That It Will Start Rooting Your Phone (It may take some time)
- Once Rooting Process Is Finished. You, Will, Get A Notification “Root Succeeded”.
- That’s It 🙂 You Have Successfully Root Redmi 7A Without PC
Root Redmi 7A Using PC: Method 4
- First Enable Developer Options On Redmi 7A
- Now Connect Your Phone To PC Via USB Cable
- After That Download Kingo Root Software On Your PC & Install It.
- Now Open Kingo Root Software >> After That Connect Your Phone. As Soon As You Connect Your Phone To PC. It Will Show You A Prompt On Your Phone >> Tap On Okay.
- Once Your Device Is Recognized >> Just Tap On Root.
- Once Rooting Process Is Finished. Your Phone Will Automatically Reboot.
- That’s It 🙂 You Have Successfully Rooted Your Redmi 7A
Root Redmi 7A Without PC: Method 5
- First Download KingRoot App And Install It
- Open KingRoot App >> Tap On Try It Button
- Now You Will See Android Logo >> Just Tap On That And Rooting Process Will Start On Your Phone
- Once Your Device Is Rooted Successfully. You, Will, Get A Notification That “Successfully Obtain Root”.
- That’s It 🙂 You Have Successfully Root Redmi 7A Without PC
Related Article: How To Unroot Redmi 7A
Final Words: So, this is all about How To Root Redmi 7A, I have shown you five easy methods to Root. Make sure to comment down below which method works for you. We would love to hear from you!