Are you looking for a guide on how to install Custom ROM on Galaxy A51? If yes, in this article, I will show you a step-by-step procedure to flash Custom ROM on this device. The method that I have shown is straightforward, and you don’t need a PC/ Laptop. You can install any Custom ROM on Galaxy A51 without a PC.
I will highly recommend you to read the complete guide before proceeding to the steps part. The reason why I am saying is, flashing files on your device is very risky. If you miss anything, then you will be ended up bricking your smartphone. So, please first read the guide, then apply the steps.

This process will wipe all your data, so take a full android backup if you haven’t done it already. I have also suggested to you some sources to download Custom ROM for Galaxy A51 without worrying about security. To flash ROM, we will use TWRP Recovery as it is very convenient and super easy to flash files and ROMs.
Let’s quickly jump into the steps.
Page Contents
About Samsung Galaxy A51
This Samsung Galaxy A51 is a newly launched device by Samsung. It has some great features, Here is some Key Specification of the Samsung Galaxy A51:
- This phone comes with a 6.5 Inches Full HD+ 1080 x 2400 pixels Super AMOLED Display.
- Samsung Galaxy A51 is powered by the Exynos 9611 which is an Octa-Core CPU
- It has 16 GB of RAM and 512 GB of Internal Storage
- Moving to the OS this device runs on Android 10.0 (Q) One UI 2
- Camera – It has a Quad Rear-Facing Camera of 48 MP + 12 MP + 5 MP + 5 MP and the Front-Facing is a 32 MP camera.
- Moving to the battery it has a Non-removable Li-Po 4000 mAh battery which also supports a Fast battery charging 15W.
- Sensors: It has the following Fingerprint (under display, optical), accelerometer, gyro, proximity, compass sensors.
// Source: GSMArena
What is Custom ROM?
Custom ROM is a modified version of the ROM. It comes with lots of cool features and customization that your original ROM does not have. If you install a custom ROM on your android device, that means you are replacing the pre-installed version of Android with a third-party ROM.
You can easily install Custom ROM on android with the help of Custom Recovery like TWRP Recovery. These modified ROMs have many advanced features that you cannot expect from the stock firmware installed on your device.
Where to Download Custom ROM?
I highly recommend XDA Developers. It the most trusted place to download ROM. Any ROM will work as long it is made for your specific device.
Some Popular Custom ROMs
Here are some popular ROMs that you must try on your android device.
Advantages Of Installing Custom ROM
- Upgrade your smartphone to the latest version of Android.
- Clean Android Experience without Ads/Bloatware.
- Experience New User Interface/ Custom Design.
- You will get lots of customization options.
- Get Root access by default (Administrative).
- Unlock advanced features and functions.
Disadvantages Of Installing Custom ROM
- Your device warranty will be void.
- An unstable version of ROM will end up bricking your device.
- If you missed any steps, your phone would be stuck in a boot loop.
- You will not receive OTA updates from your phone manufacturer.
- Absence of Google applications. (You need to flash GApps manually.)
Pre Requirements
- Take a full backup of data to restore if anything goes wrong.
- Important Step: Install TWRP Recovery on Galaxy A51 to flash files.
- Fully charge your Samsung device to avoid interruptions.
- Make sure to move the downloaded ROM file to Internal Storage.
Steps to Install Custom ROM on Samsung Galaxy A51
As I already mentioned in the pre-requirements section, we need to have TWRP Recovery installed on Galaxy A51 to flash ROM files. So, I assume that you have installed TWRP on your device.
Also, you must take a full backup of your android before applying the steps. Backup is crucial; it can save your device if anything goes wrong during the steps.
- First, reboot your device into TWRP Recovery mode.
- Turn Off your phone.
- Press and hold the
Volume Up + Power button; as soon as you see the boot screen, release the Power button (do not release the volume up key until you boot into TWRP mode.)
- Otherwise, you can also use the ADB command to boot into recovery mode. (Here is the guide to step ADB Fastboot Drivers.)
- Connect your phone to PC/Laptop
- Open the command prompt on your PC and type the following command.
adb reboot recovery
-
- This will boot Galaxy A51 into recovery mode.
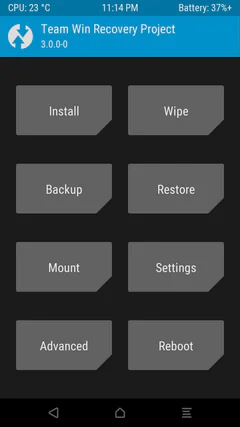
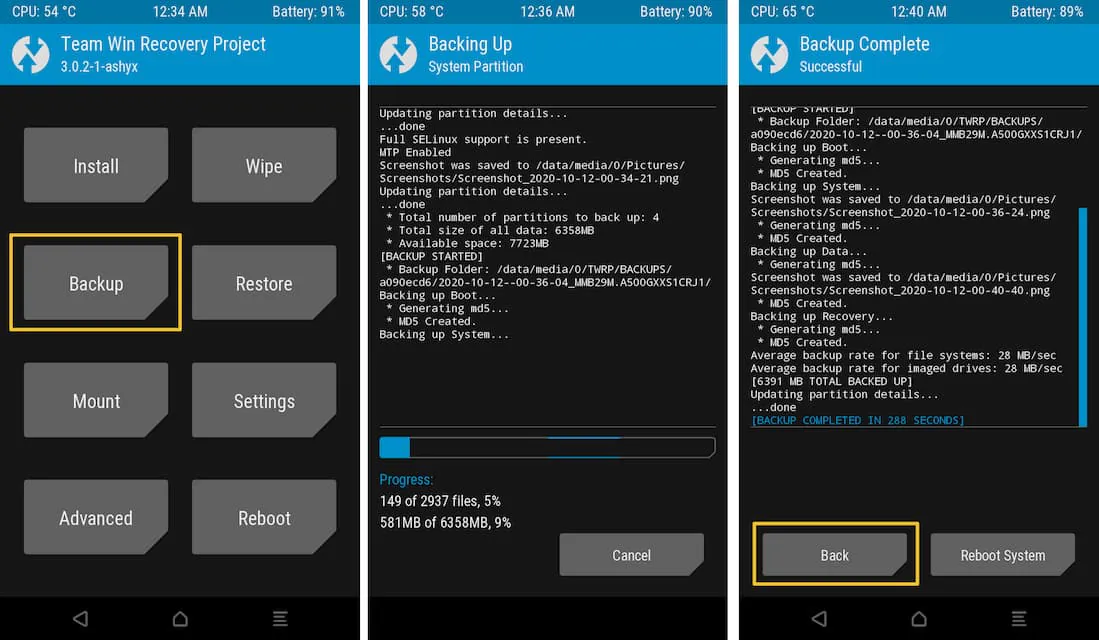
- Take Backup of your previous ROM.
- To do that, Tap on Backup, → Keep it on a default setting & choose your Storage type → After that, Swipe To Backup.
- Once the Backup process finishes.
- Go back to the TWRP homepage.
- Select Wipe and Swipe to Factory Reset on the bottom of the screen.
- Go back to TWRP main menu, tap on Install, and select the custom ROM .zip file.
- After selecting the .zip file, do Swipe to Confirm Flash on the bottom of the screen to begin the custom ROM installation process.
- This may take some time, so be patient.
- Once your ROM is successfully flashed, you’ll see the Wipe cache/Dalvik option, select it and then do Swipe to wipe on the bottom of the screen.
- After Cache & Dalvik wipe completes, go Back, and then select the Reboot System button.
- Congrats! You have successfully flashed Custom ROM on Galaxy A51.
Wrapping Up –
In this comprehensive guide, we learned about Custom ROM, the trusted place to download the ROM file, and finally, the installation process. I have shown you the easiest way to Install Custom ROM on Samsung Galaxy A51. If you have any questions regarding this guide or face some problem, leave the comment below, and we will help you fix it up.