This guide will show you How to Root Samsung Galaxy S20/S20 Plus/S20 Ultra with the advanced rooting method Magisk. I have shown you two methods to Root this smartphone, one with TWRP recovery and the second one without the necessity of TWRP.
If your device doesn’t support TWRP, then you can go with the second step. For this method, we need stock firmware boot image and patch it with Magisk. Now let me tell you why we are using Magisk over other rooting methods like SuperSU.
This guide will work on Samsung Galaxy S20/ Galaxy S20 Plus/ Galaxy S20 Ultra. So, don’t get confused.
Page Contents
- 1 What is Magisk?
- 2 About Samsung Galaxy S20
- 3 What Does Rooting Means?
- 4 Let’s Root Samsung Galaxy S20 Plus (Beginners Friendly Guide)
- 5 Method 1: Root Samsung Galaxy S20 using TWRP Recovery
- 6 Method 2: Root Samsung Samsung Galaxy S20 without TWRP Recovery
- 7 How to Verify if your Samsung Galaxy S20/S20+/S20 Ultra is Rooted successfully?
What is Magisk?
Magisk is a highly advanced way of rooting android systemless-ly. This means that Magisk root android without changing or modifying the system partition. Hence you can receive OTA updates, run apps that require to pass Google’s SafetyNet tests.
Unlike other methods, you have to struggle a lot to install OTA updates, but with Magisk, you can easily receive updates without any issues. Also, the best part about this method is that you can install Magisk on almost any android device running Android 4.2 to Android 11 (Latest).
This is the reason why we are using Magisk to Root Samsung Galaxy S20 Ultra over other rooting methods.
About Samsung Galaxy S20
The Samsung Galaxy S20 is a newly launched android smartphone. It offers great features for the price. Here is the Key Specification of the Samsung Galaxy S20:
- This phone comes with a 6.2 Inches Full HD Plus Dynamic AMOLED Display.
- Samsung Galaxy S20 is powered by the Exynos 990 which is an Octa-Core CPU
- It has 8 GB of RAM and 128 GB of Internal Storage
- Moving to the OS this device runs on Android 11 One UI.
- Camera – It has a Triple Rear-Facing Camera of 12 MP + 64 MP + 12 MP and the Front-Facing is a 10 MP shooter.
- Moving to the battery it has a Non-removable 4000 mAh battery which also supports Fast battery charging.
- It has the following Fingerprint (under display, ultrasonic), accelerometer, gyro, proximity, compass, barometer sensors.
What Does Rooting Means?
Rooting Android simply means giving a superpower to your phone. It opens up many customization and tweaks for your smartphone. Once you root your phone, you have full control over your Android System files.
You can do the very greatest thing after rooting your device is installing Custom ROM, removing unwanted apps (bloatware), installing Modules, and much more. But before we Root, we must understand the Advantages and Disadvantages of Rooting your device.
Advantages of Rooting
Here are some Pros or Advantages of Rooting Samsung Galaxy S20
- You can install Custom ROM on your device.
- Update your Phone to a newer version of Android.
- Easily install Incompatible Apps on your phone.
- You can flash Custom Kernel to increase device performance.
- Take Complete Backup of your Android using nandroid backup.
Disadvantages of Rooting
Here are some Cons or Disadvantages of Rooting Samsung Galaxy S20
- The phone warranty will get void.
- Samsung Galaxy S20 will no longer Secure.
- You may face lagging issues on Samsung Galaxy S20.
- While Rooting, if you miss out on any steps, then your device might get bricked.
Pre-Requirements
- Before proceeding to steps, make sure to Unlock Bootloader on Samsung Galaxy S20.
- Fully charge your device. If not, then you will be stuck in between the process.
- Take the full backup of your android.
- For method 1: You need to Install TWRP Recovery on Samsung Galaxy S20.
- For method 2:
- Download the Latest SDK Platform tools and ADB Fastboot Drivers.
- Install the latest Samsung USB drivers.
- This method requires a PC/Laptop to execute ADB commands.
- Samsung Galaxy S20 original USB cable.
- This guide is only for Samsung Galaxy S20. Please do not try these steps on any other smartphone.
Let’s Root Samsung Galaxy S20 Plus (Beginners Friendly Guide)
If you are completely new to the rooting community, then don’t worry. We have included everything you need to know about the process of rooting android devices.
As I already mentioned above, this guide includes two types of methods, first by flashing the Magisk installer zip using TWRP recovery and the second method by flashing Magisk patched boot image using fastboot command.
So, let’s quickly jump to the process.
Note: Make sure to read this guide completely to avoid confusion or misunderstanding.
Method 1: Root Samsung Galaxy S20 using TWRP Recovery
- Download the Latest Magisk Zip file on your Samsung Galaxy S20 device.
- Move the downloaded zip file to your phone’s external storage.
- Now, Reboot Samsung Galaxy S20 in TWRP recovery mode.
- Turn Off your phone.
- Press and hold the
Volume Up + Power buttonuntil you see the boot screen, release the Power button (do not release the volume up key until you boot into TWRP mode.)
- Alternatively, you can also use the ADB command to boot into recovery mode.
- Connect Samsung Galaxy S20 to your PC/Laptop.
- Open the Command Prompt on your PC and type the following command.
adb reboot recovery
-
- This will boot Samsung Galaxy S20 in recovery mode.
- On TWRP main screen, Tap on Install.
- Locate the Magisk installer zip file and Select it.
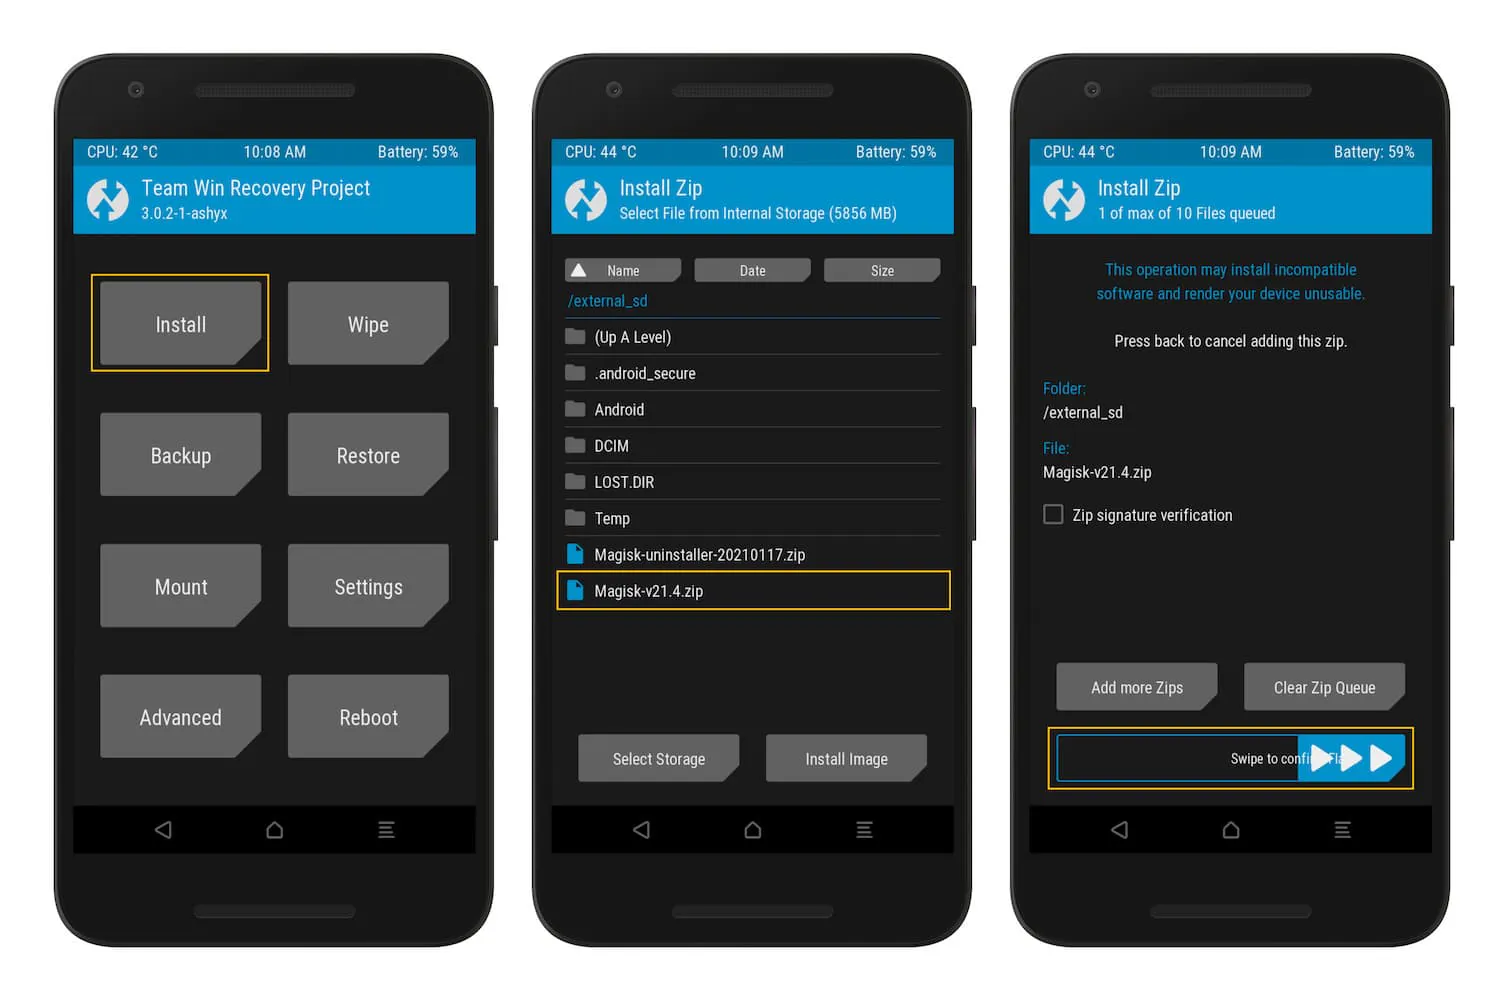
- Finally, Swipe the Slider on the bottom of the screen to flash the file and install Magisk on your Samsung Galaxy S20 phone.
- Once the flashing process completes, Tap on Reboot System.
Now open the Magisk Manager app and check if you see all green checks on the app screen. If you don’t see the app, you can install it from this link.
After successfully applying the above steps, your Samsung Galaxy S20 device will get root access without any issues. In case you are facing any problems in any steps, let me know in the comments.
Method 2: Root Samsung Samsung Galaxy S20 without TWRP Recovery
- Download Stock Firmware for Samsung Samsung Galaxy S20.
- Extract the
boot.imgfile from stock firmware. (Check out this guide.) - Move the boot image file to your phone’s internal storage.
- Download Magisk Manager Canary APK on your phone and install it.
- Open the app from the app drawer.
- Tap on “Install” and then tap on “Next.”
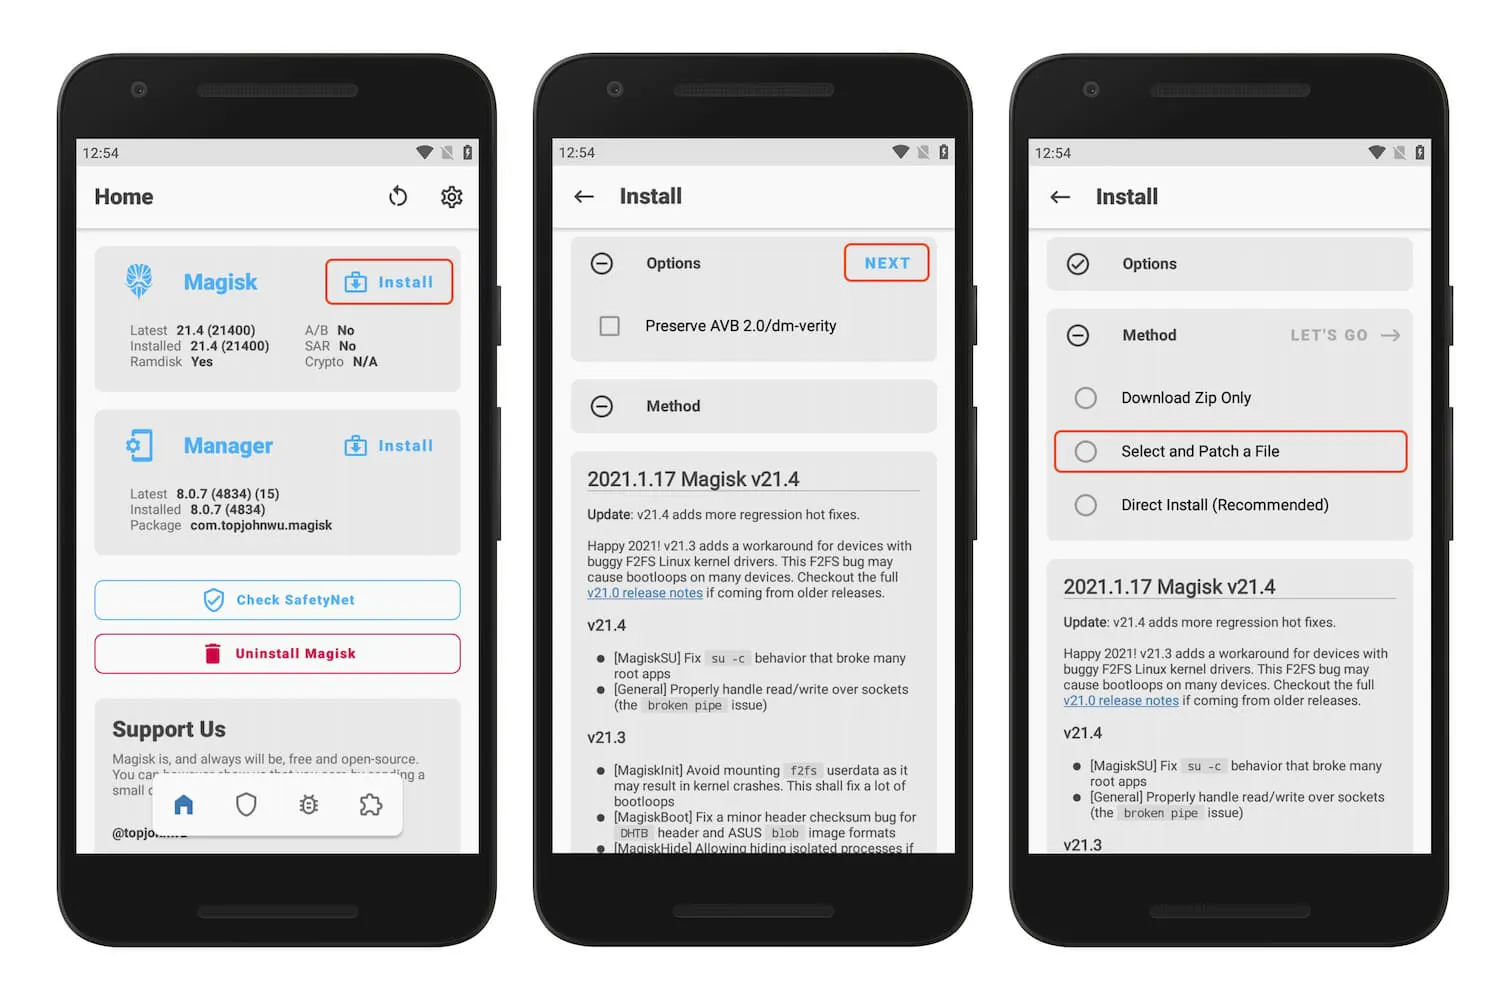
- Next, tap on the “Select and Patch a File” option.
- Locate the boot image file (e.g.,
boot.img) and Select it. - Magisk Manager will patch the boot image file with the latest version of Magisk.
- Once done, the boot image gets patched. It will get saved in the
Download folderof your phone. - Copy the
magisk_patched.imgfile to your PC and rename it to boot.img. - Now, convert boot.img to boot.tar file.
- To do that, right-click on the boot.img file.
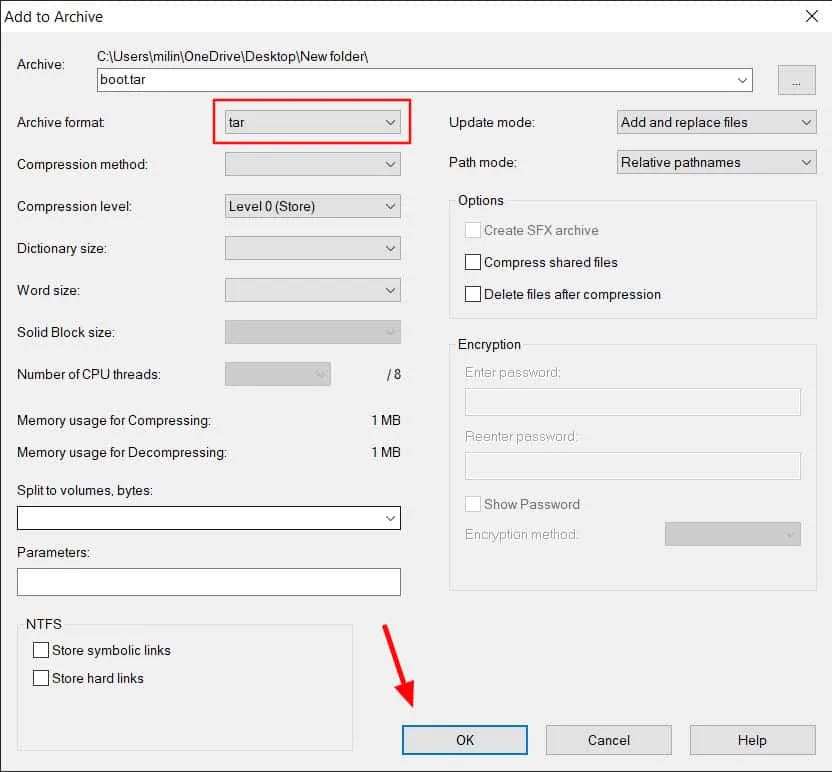
- 7-Zip ZS → click on Add to archive.
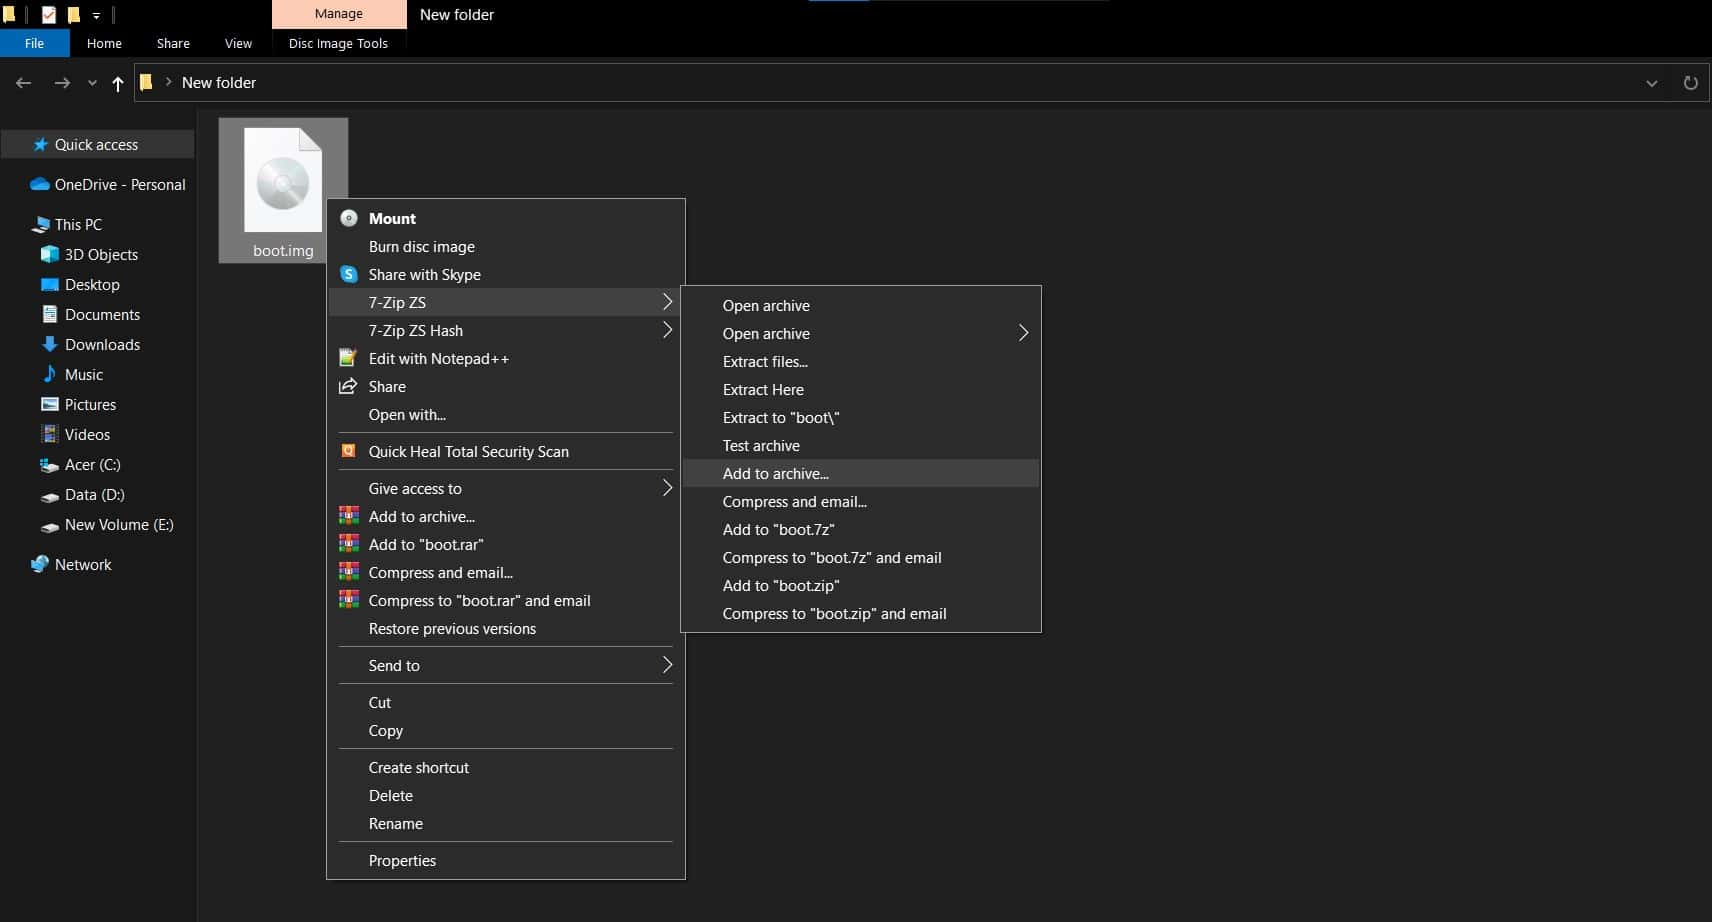
- Select the Archive format to tar and hit OK.
- Boot Samsung Galaxy S20 into ODIN/Download mode.
- Turn off your device.
- You can do so by holding the
Volume Down + Volume Up + Power keyssimultaneously for a few seconds. - Release the keys when you get a screen with an exclamation sign.
- Press the Volume Up button to enter the Download Mode.
Do these Steps on PC
- Now we have to flash the
boot.tarfile using ODIN for rooting. - Download the Odin flash tool and extract the file.
- Run
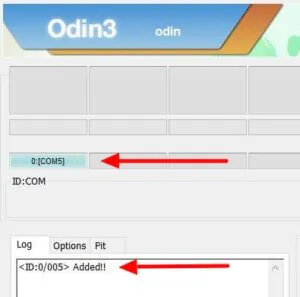
Odin.exefile. - Connect your Samsung Galaxy S20 device to the PC. You will see a blue sign in Odin.
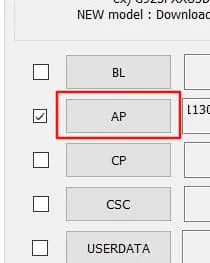
- Now, click on AP and select the
boot.tarfile.
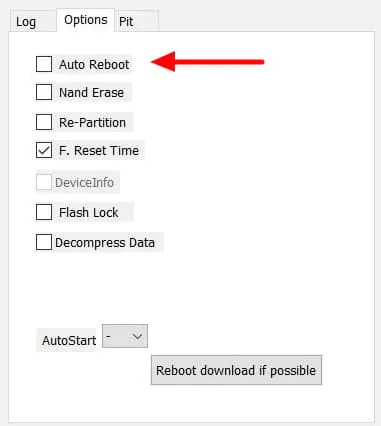
- Go to the Options tab and uncheck the Auto Reboot option.
- Now, tap on the Start button to root your device.
- The flashing process will take a few minutes, so be patient. Once done, you will see PASS on the top of Odin.

- Disconnect your Samsung Galaxy S20 smartphone.
- Magisk is now successfully flashed to your device! But there are still several steps before you use the device.
- We now want to boot into the stock recovery to factory reset Samsung Galaxy S20.
- Press
Power + Volume Downto exit download mode, and as soon as the screen turns off, quickly pressVolume Up + Powerto boot to the recovery partition. - In the Stock Recovery menu, use volume buttons to navigate menus and the power button to select the option.
- Select Wipe data/factory reset to wipe the data of the device.
- Finally, select Reboot system now.
- Press
- The first boot will take some time.
- Congrats! You have successfully rooted your Samsung Galaxy S20 Plus with Magisk.
If you can not see Magisk Manager on your Samsung Galaxy S20 phone, you need to install the APK manually. Here is the link to download the latest Magisk Manager App.
How to Verify if your Samsung Galaxy S20/S20+/S20 Ultra is Rooted successfully?
- Download the Magisk Manager app (if you haven’t already).
- Open Magisk Manager app.
- If you see all options with Green Tick, that means your phone has successfully got root privilege.
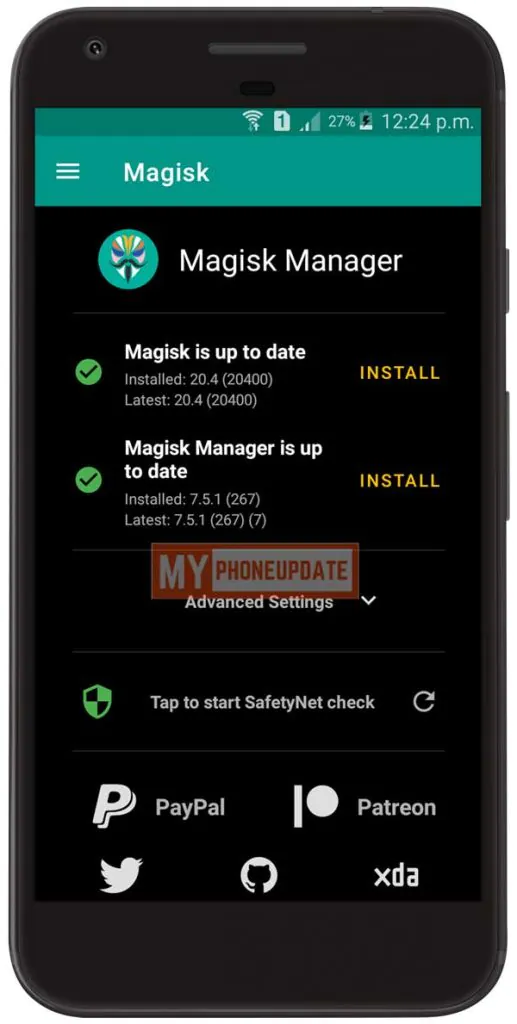
- As you can see from the above screenshot.
Now, if you want to Unroot your device, it’s very simple and straightforward. You have to follow this guide – Unroot Samsung Galaxy S20
Also Read: Root Samsung Galaxy A11
Conclusion –
So, this was the comprehensive guide on how to Root Samsung Galaxy S20 smartphone. I have tried my best to make this guide as simple as possible. However, if you still encounter any problems while applying the steps, please let me know in the comments. I will try to resolve your issues as soon as possible.