Hey there, are you looking for a guide on how to Root Oppo K1 smartphone? If yes, then you are at the right place. In this comprehensive rooting tutorial, I have shown you the easiest method to Root this smartphone.
I have shown you six different methods to Root your Oppo K1 device. If anyone of the method failed then you can try other methods that worked for you. The methods shown are effortless and straightforward. Anyone with basic knowledge of android can apply the shown steps.
Page Contents
About Oppo K1
This Oppo K1 is having 6.41 Inch Full HD+ AMOLED Screen in 19.5:9 Aspect Ratio. This device is powered by a Snapdragon 660 Processor which is an Octa-Core Processor and it has the Adreno 512 GPU. It comes with 4GB of RAM with 64GB of Internal Storage. It has In-Display Fingerprint Scanner.
On talking about the camera it’s a dual rear-facing camera 16 MP and 2MP for depth sensing and the front-facing camera is a 25MP shooter. It has a Non-removable Li-Ion 3600 mAh battery.
It also has all the required sensors like Fingerprint (under display), accelerometer, gyro, proximity, compass. This device is priced at 210 EUR.
What Does Rooting Means?
Rooting Android simply means giving a superpower to your phone. It opens up many customization and tweaks for your smartphone. Once you root your phone, you have full control over your Android System files.
You can do the very greatest thing after rooting your device is installing Custom ROM, removing unwanted apps (bloatware), installing Modules, and much more. But before we Root, we must understand the Advantages and Disadvantages of Rooting your device.
Advantages of Rooting
Here are some Pros or Advantages of Rooting Oppo K1
- You can install Custom ROM on your device.
- Update your Phone to a newer version of Android.
- Easily install Incompatible Apps on your phone.
- You can flash Custom Kernel to increase device performance.
- Take Complete Backup of your Android using nandroid backup.
Disadvantages of Rooting
Here are some Cons or Disadvantages of Rooting Oppo K1
- The phone warranty will get void.
- Oppo K1 will no longer Secure.
- You may face lagging issues on Oppo K1.
- While Rooting, if you miss out on any steps, then your device might get bricked.
Pre-Requirements
- Before proceeding to steps, make sure to Unlock Bootloader on Oppo K1.
- Fully charge your device. If not, then you will be stuck in between the process.
- Take the full backup of your android.
- You need to Install TWRP Recovery on Oppo K1.
- Download the Latest SDK Platform tools and ADB Fastboot Drivers.
- This guide is only for Oppo K1. Please do not try these steps on any other smartphone.
Root Oppo K1 using Magisk: Method 1
- Download the latest Magisk Zip file on your Android device.
- Move the downloaded Magisk Zip file to your phone’s internal storage.
- Now, boot your phone into TWRP recovery mode.
- Turn Off your Oppo K1.
- Press and hold the Volume Up + Power button. As soon as you see the boot screen, release the Power button (do not release the volume up key until you boot into TWRP mode.)
- Otherwise, you can also use the ADB command to boot into recovery mode.
- Connect your Oppo K1 to PC/Laptop
- Open the command prompt on your PC and type the following command.
adb reboot recovery
-
- This will Reboot Oppo K1 into recovery mode.
- On TWRP main screen, Tap on “Install”.
- Locate the Magisk installer zip file and Select it.
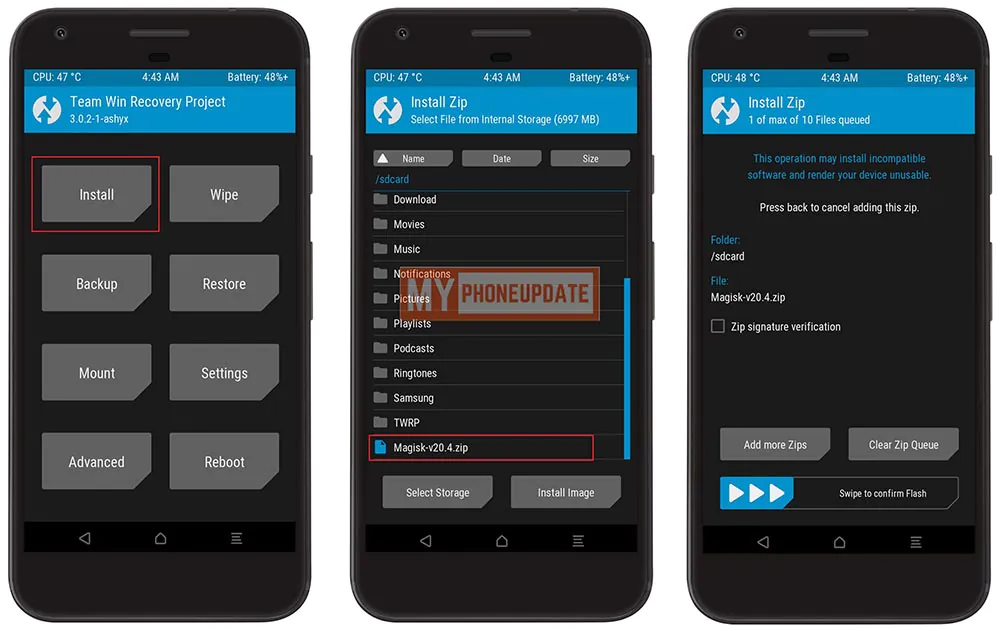
- Finally, “Swipe the Slider” on the bottom of the screen to flash the file and install Magisk on your phone.
- Once the flashing process completes, Tap on “Reboot System”.
Now open the Magisk Manager app and check if you see all green checks on the screen.
Root Oppo K1 with SuperSU: Method 2
- Download the latest SuperSU Zip file on your Android device.
- Move the downloaded SuperSU zip file to your phone’s internal storage.
- Now, boot your phone into TWRP recovery mode.
- Turn Off your phone.
- Press and hold the Volume Up + Power button. As soon as you see the boot screen, release the Power button (do not release the volume up key until you boot into TWRP mode.)
- Otherwise, you can also use the ADB command to boot into recovery mode.
- Connect your Oppo K1 to PC/Laptop.
- Open the command prompt on your PC and type the following command.
adb reboot recovery
-
- This will Reboot Oppo K1 into recovery mode.
- On TWRP main screen, Tap on “Install”.
- Locate the SuperSU installer zip file and Select it.
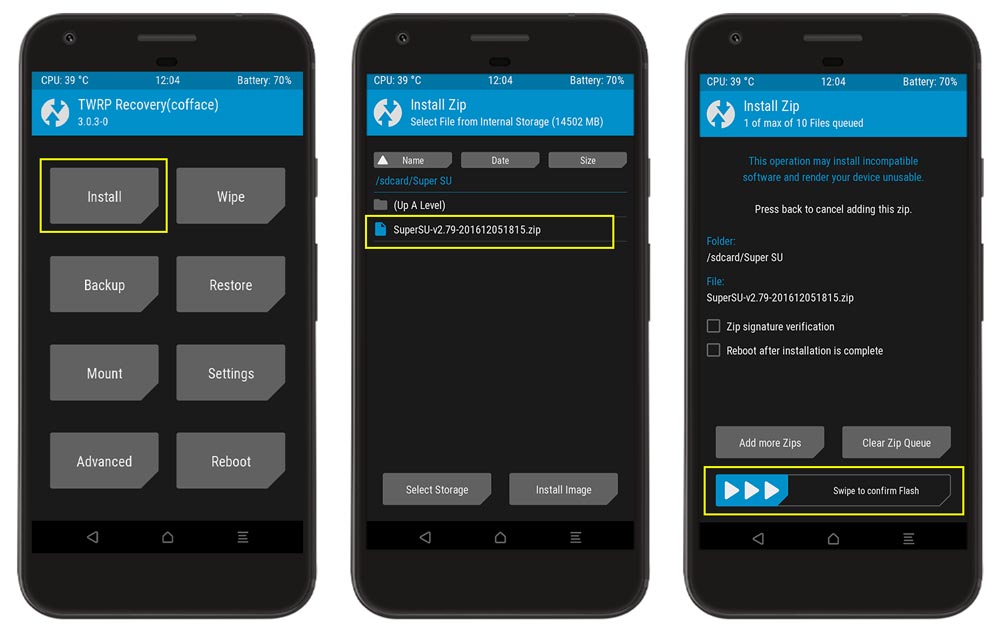
- Finally, “Swipe the Slider” on the bottom of the screen to flash the file and install SuperSU on your phone.
- Once the flashing process completes, Tap on “Reboot System”.
Now download the Root Checker app on your phone and check if you see all green checks on the screen.
Root Oppo K1 via Dr.Fone Root: Method 3
- Download and install Dr.fone Root software on your PC.
- Connect Oppo K1 device to PC/Laptop via USB cable.
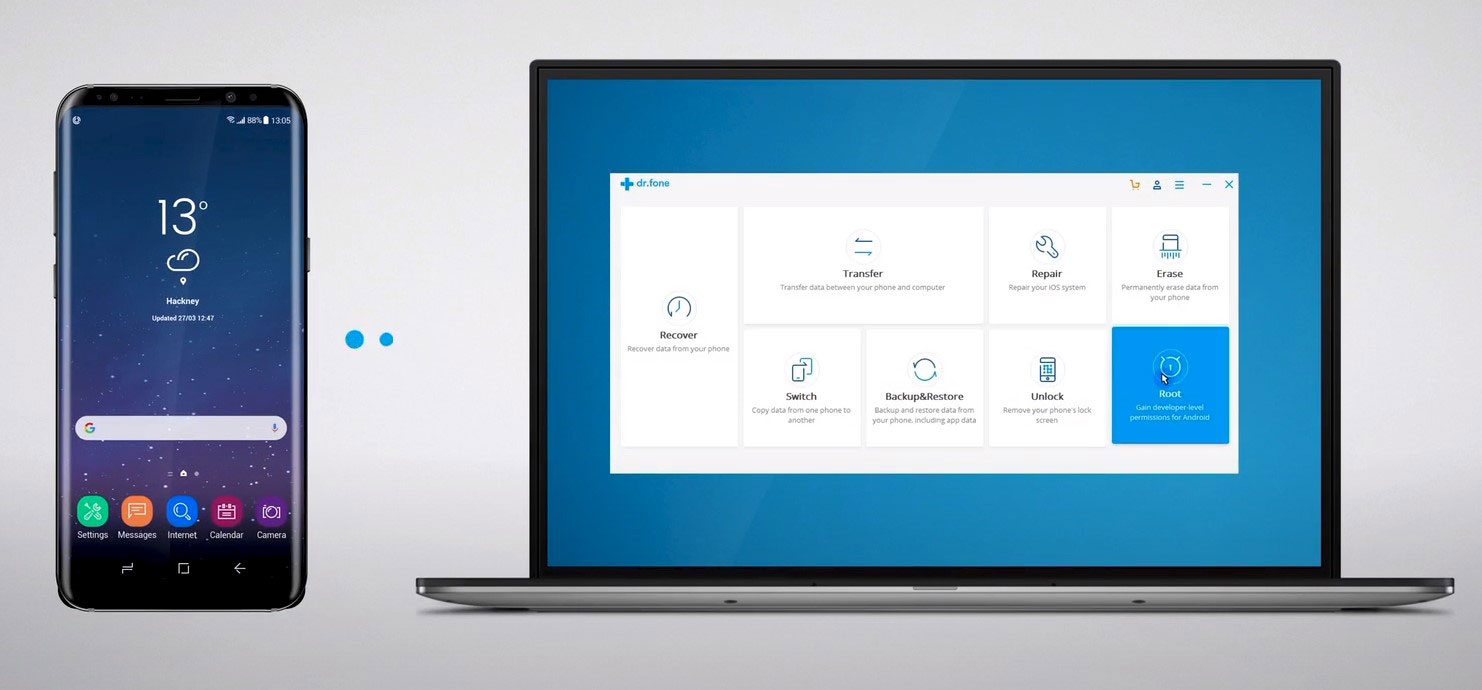
- Once the phone is connected, click on the “Start” button.
- Now the software will then find your device package and prepare a way to root your phone.
- Click on “Root Now” to begin rooting your phone.
- The phone will ask if you would like to root the phone; tap on “Confirm” to continue the rooting.
- You have successfully rooted Oppo K1 using Dr.Fone software.
Root Oppo K1 using KingoRoot PC: Method 4
- First off, enable Developer Options on Oppo K1.
- Head over to Settings > About Phone > Tap on Build Number 5 to 7 times.
- Go Back > Tap on Developer Options > enable USB Debugging option.
- Now download Kingo Root Software on your Windows PC and install it.
- Open Kingo Root Software.
- Connect Oppo K1 Phone to PC via USB cable as soon as you Connect your Phone. It will show you a Prompt on your Phone > Tap on Okay.
- Once your Device is Recognized, Tap on Root.
- It will take around 5-7 minutes to complete the Rooting Process.
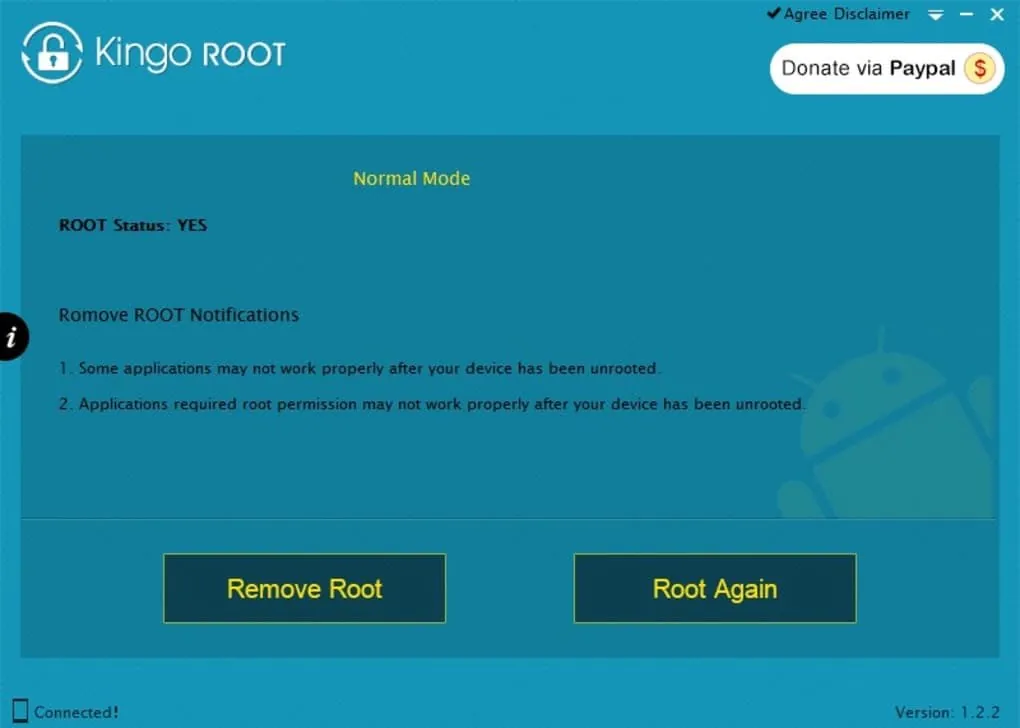
- Once the rooting process is finished, your Phone will automatically Reboot.
- All Done! You have Successfully Rooted your Oppo K1.
Root Oppo K1 with iRoot App: Method 5
- First, Download iRoot APK on your Oppo K1 device.
- Open the downloads folder and Tap on the “iRoot.apk” file to install it.
- If you get a warning message, then follow the below steps.
- Go to Settings > Security > enable Unknown Sources option.
- After the app is successfully installed.
- Open KingoRoot App > Tap on the “Root Now” button.
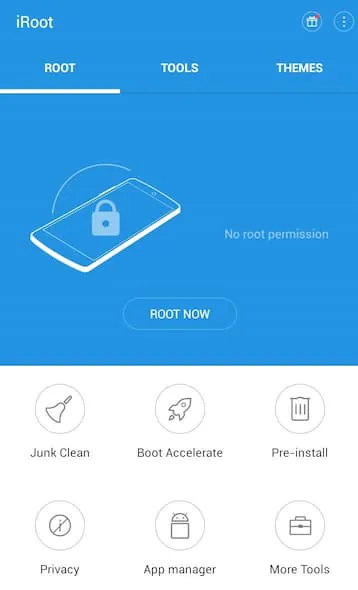
- The rooting process will start on your Phone. You will see a notification “Root Succeeded”.
- That’s it. You have Successfully Rooted Oppo K1 Without PC.
Root Oppo K1 without PC: Method 6
- First, download KingoRoot App on your Oppo K1 device.
- Open the downloads folder and Tap on the “KingoRoot.apk” file to install it.
- If you get a warning message, then follow the below steps.
- Go to Settings > Security > enable Unknown Sources option.
- After the app is successfully installed.
- Open KingoRoot App > Tap on the “One Click Root” button.
- The rooting process will start on your Phone.
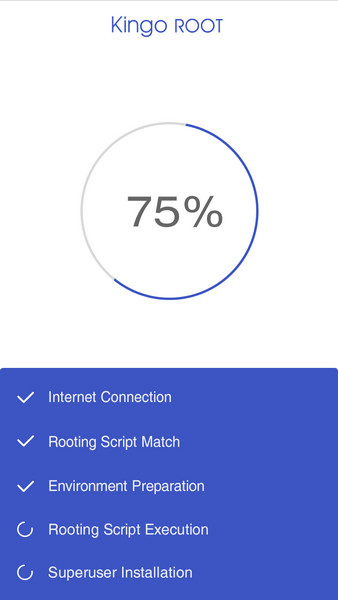
- You will see a notification “Root Succeeded”.
- That’s it. You have Successfully Rooted Oppo K1 Without PC.
Related Article: How to Unroot Oppo K1
Conclusion
So, this was a comprehensive guide on how to Root Oppo K1 smartphone. I have tried my best to make this guide as simple as possible. However, if you still encounter any problems while applying the steps, please let me know in the comments. I will try to resolve your issues as soon as possible.
rooting k1 via magisk not working
Try now its working