Page Contents
Install Pixel 3 Camera On Xiaomi Mi A1
Hey, there today I have come with the guide on How To Install Pixel 3 Camera On Xiaomi Mi A1, Recently Xiaomi Mi A1 got an OTA update for Android 9.0 Pie. And after the update, Google Camera was not working anymore. But you do not need worry here is the complete guide for Xiaomi Mi A1 Pixel 3 GCam.
After you install Xiaomi Mi A1 Pixel 3 GCam you will be able to click portrait photos, enjoy night sight mode. Yes, that’s right this latest Pixel 3 GCam comes with Night Sight Mode Support.
Xiaomi Mi A1 Pixel 3 GCam With Night Sight Mode
As I already told you that this Pixel 3 Xiaomi Mi A1 Pixel 3 GCam comes with Night Sight Mode Support. Now if you do not know about Night Sight Mode then it is an amazing feature that gives you awesome photos on the low lighting condition. It will enhance the picture with complete detailing.
Features Of Xiaomi Mi A1 Pixel 3 GCam
- You Are Getting Front Portrait
- Support For EIS (Electronic Image Stabilization)
- You Will Get Night Mode Option
- Slow Motion Video Capturing
Also Read: How To Fix Mi A1 Battery Draining Issue
Steps To Install Pixel 3 Camera On Xiaomi Mi A1
Step-1: First Off We Need To Install Magisk Manager On Xiaomi Mi A1
Step-2: Enable USB Debugging, Follow The Steps
- Go To Settings >> About Phone >> Tap Build Number 6-7 Times
- Now Go Back You Can A New Option “Developer Options”
- Go To Developer Options >> Scroll Down And Enable USB Debugging
Step-3: Now Connect Mi A1 To PC/Laptop Via USB Cable
Step-4: Once Done Come To Your PC And Setup Adb And Fastboot Drivers
Step-5: Now Download Platform Tools & Extract It On Your Desktop
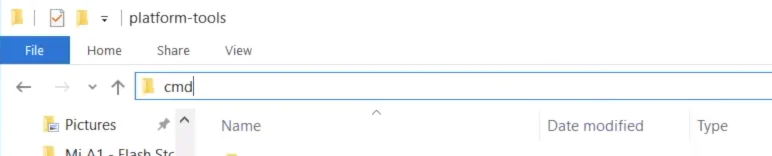
Step-6: Go To Platform Tools Folder >> Type “cmd” In The Address Bar & Press Enter To Open Command Prompt
- Now On The Command Window Type The Following Command
adb devices
- And Hit Enter, You Must See Your Device Connected
- Now On Your Phone You Will Get A Pop-up Saying Allow “USB Debugging” Simply Allow It
- Come Back To Command Window And Again Type The Same Command
adb devices
- Hit Enter & It Will Show You Some Random String Followed By Devices. It Means Your Device Is Connected
- Now Type The Following Command
adb shell
- Hit Enter, After Have To Type
su
- Hit Enter, Now On Your Mi A1 The Superuser Request For The Shell Is Prompt Permission
Now If You Have Unfortunately Miss That Pop-up Or Miss To Grant The Permission. Then You Can
Go To Magisk Manager >> Swipe From The Left >> Go To Superuser And Grant The Permission For The Shell
Step-7: Once You Done That Go Back To Your PC
- Now Copy These Commands And Paste It On-Command Window (This Will Enable Camera 2 API And EIS On Your Device)
Enable HAL3: setprop persist.camera.HAL3.enabled 1
Enable EIS: setprop persist.camera.eis.enable 1
- After That Go To Your Phone And Restart It
Step-8: Once Your Device Is Restarted Now You Can Install Pixel 3 Google Camera On Your Xiaomi Mi A1. Below I Have Given The Link To Download GCam Apk
Download GCam Apk
B-S-G Google Camera port – Pixel 3
Pixel 2 Camera for Mi A1 (Arnova)
Step-9: Now you can install any version of Google Camera on your Mi A1
Step-10: That’s It 🙂 You Have Successfully Installed Pixel 3 Camera On Your Mi A1
Also Read:
- How To Downgrade Mi A1 Android Pie To Oreo
- Install Google Camera On Mi A1 Android Pie
- Unlock Bootloader On Mi A1 Android Pie
Final Words: So, this is all about How To Install Pixel 3 Camera On Xiaomi Mi A1 After Android Pie Update. I have shown you the easiest method to Install Pixel 3 Camera. I hope this guide worked on your phone. If you want to ask any questions related to this Pixel 3 Camera then make sure to comment down below. We would love to hear from you.
Redmi note 5 me kaise install करे miui 10 है कोई आइडिया दे दो भाई..
Bro i will update an article for that and i will the link here –>
What are the pre requisites? I just have my Mi A1 unlocked? Necessary to Root?
Root Access Is Required You Can Follow This Guide ===> Install Magisk Manager On Xiaomi Mi A1
bro… when I running camera2api and eis command. it says Enable: not found.
and thus can not run any gcam. please help how to solve this problem?
Rishabh message me on my facebook page for better conversation. Click Here To Join My Facebook Page MyPhoneUpdate Facebook Page
I am having the same problem